Install Sunyee Cree 126W light bar - SG II Forester

^ Thanks, PS

I have now completed this, along with testing that it works as advertised. I have a 12V power supply that plugs into 240V for this purpose. Disconnecting the high beam light wire from the power supply serves the same purpose as the high beam switch in the car being turned off.

Imported the weird wiring diagram that came with the light bar into Photoshop, and have modified it so that all the missing bits have been filled in, and labelled the wires so that even I should be able to follow it ... :poke: :iconwink: :lol:.

After I've done a few chores, I will resize it and upload it to this thread.
 
126W Light Bar wiring diagram

Gidday PS

Here is what I have worked out.

Sunyee-au+126W+Light+Bar+wiring+diagram+Modified-2_small.jpg


The full size, high resolution images is available here
 
^ Keep in mind that up to and including the series I SG, Foresters had two headlights with dipping bulbs. From the series II SG onwards they have four headlights, all with single filament bulbs.

This makes a substantial difference to the connectors and wiring.

The wiring diagram I have posted is specific to this light bar, and is also a schematic for it. The relay supplied with it does not have numbered or labelled terminals.
 
Last edited:
Gidday PS

Here is what I have worked out.

Sunyee-au+126W+Light+Bar+wiring+diagram+Modified-2_small.jpg


The full size, high resolution images is available here
Thanks Ratbag for this. I'll have to digest this as electronic is really not my strength :poke:
I probably will play with the harness that comes with the light bar over the weekend.
Cheers
 
^ I hope it's right, PS.

I now have the same joy you are having of working out which is the correct high beam wire to connect that wire into in the car!

At least we now know what all the wires on the light bar loom are actually for ... the supplied wiring diagram is a bit vague, to say the least ...

If I have cocked it up, I will amend the diagram and/or info here.

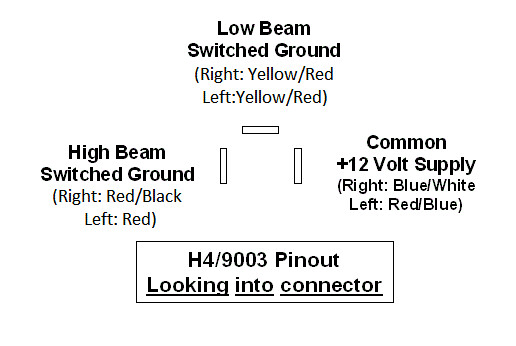
When I try the installation, NL's pinout colour coding will help, if it has remained the same ...

While installing, I will make notes and take photos.
 
I don't think that diagram will work on a Subaru!

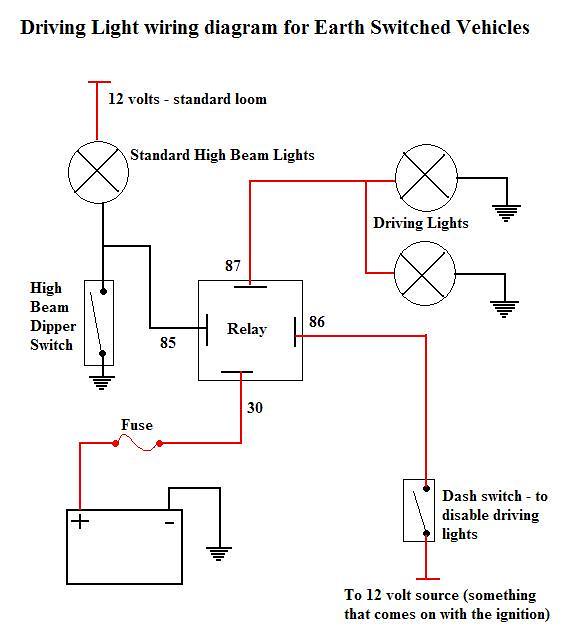
If I'm reading it right, the black earth wire marked "B" on the relay needs to go to the high beam wire (negative switching remember so the high beam & low beam wires are both earths).

The black earth wire from the lightbar needs to go to its own earth (use an existing earth in the engine bay, there are many esp near the battery)

Red wire that they say goes to the high beam positive is wrong! This must go to the battery via a 30A fuse.

I would suggest you use the diagram I posted, courtesy of El Freddo, adapted to your cars wiring. The posts on the relay are correct (30, 85-87) & this has been used by many people fitting driving lights to their Subie including myself. I know it works :biggrin:

If your relay doesnt have those numbers on the posts, then get a high quality Narva relay, they're only like $10 & are reliable
 
Gidday NL

I very much value your input on this! Modern car wiring is a nightmare. FTM, the wiring on my 1968 Landcruiser was incomprehensible, and it was as simple as ... :shrug:. Other than disconnecting both wires from any given light, they just kept on working! Really weird, and in over 100K miles I owned it, I never actually figured out how it worked.

I don't think that diagram will work on a Subaru!

Neither do I ... I am using a 12V DC transformer as a source for testing. The "high beam light switch" consists of me touching the relay switch ground (the 18AWG wire) to the negative terminal on that transformer while holding the two light bar power wires on their appropriate 16 AWG wires of the light bar wiring loom! Hardly ideal!

If I'm reading it right, the black earth wire marked "B" on the relay needs to go to the high beam wire (negative switching remember so the high beam & low beam wires are both earths).

That may well be so. The relay will work in several different configurations.

The black earth wire from the lightbar needs to go to its own earth (use an existing earth in the engine bay, there are many esp near the battery)

That is how the relay wiring is configured. The two black wires attached to the relay terminal B (16AWG and 18AWG) are crimped together in the connection to the relay plug.

Red wire that they say goes to the high beam positive is wrong! This must go to the battery via a 30A fuse.

On reflection this morning, I agree. That was how I had first drawn it in, then changed it ...

I would suggest you use the diagram I posted, courtesy of El Freddo, adapted to your cars wiring. The posts on the relay are correct (30, 85-87) & this has been used by many people fitting driving lights to their Subie including myself. I know it works :biggrin:

If your relay doesnt have those numbers on the posts, then get a high quality Narva relay, they're only like $10 & are reliable

I have several relays lurking in the garage. However, the light bar wiring loom plug would also have to be cut off and changed. Not difficult, but replaces one perfectly adequate part (12V/40A relay switching a 10A load) with another, at extra cost.

The series II SG and onwards uses two wires for the high beam light bulbs. One red, one black each side. The voltage readings across these terminals (disconnected from the bulb), and across the individual terminals back to either side of the battery, are very different depending on whether the high beam lights are switched on or off.

The light bar and light bar wiring loom, relay and cabin switch all work, I have established that.

However, first off, I need to get some blade connectors at SCA so that I can actually connect the light bar to its own wiring loom. At that point, I can mount it, connect it and start playing with the variables in situ on the car.

Will get back to you in a few hours ...
 
Ratbag,

As Nacha has piointed out, I don't think that'll work.

I've attached a Gen3 Liberty/Outback wiring. You can see high and low use a common 12V source and rely on the negative (GND) switching to turn on.

Nacha's diagram looks ok to me. Relies on the High beam GND switching to energise the relay, and also uses a seperate fuse (rather than yours, which has standard headlight fuses then light bar fuse in series).

You will also note that the standard (at least lib) lights run off two seperate relays and supplies - for left and right.

View attachment gen3_lib_lights.pdf
 
Just got back from doing car and people shopping.

Mostly successful, except for the robber who wanted $34 for a s/h Forester driving light switch ... I almost suggested where he could fit it ...

Having a rest ATM, then need to have a blood test - I'm on weekly tests ATM. I loathe having needles stuck into me!

Duncan, that wiring diagram is absolutely different from the wiring in my Forester.

I might get to crimping the blade connectors onto the light bar tail today, but I very much doubt it. Tomorrow is probably when the experimenting can start.
 
Just got back from doing car and people shopping.

Duncan, that wiring diagram is absolutely different from the wiring in my Forester.


ok - no worries; I've got another Foz wiring digram that looks pretty much the same as that lib one, though, and attached is a 2006 Foz with seperate bulbs (admittedly JDM), but same principles apply.

2006_foz.jpg
 
Gidday all

After I have got this sorted, I reckon it would be a good idea to gather up all the correct driving light wiring diagrams and copy them to a new sticky thread.

The ones in the Hayne's manual don't seem to relate to what's actually in my car either. I need to double check this though.

Time to move the cat off my lap and go and have that blood test, I guess ... :(.

I'm still getting used to following my bull bar around ... :iconwink:
 
Gidday all

After I have got this sorted, I reckon it would be a good idea to gather up all the correct driving light wiring diagrams and copy them to a new sticky thread.

:woohoo::woohoo::woohoo:
 
Mostly successful, except for the robber who wanted $34 for a s/h Forester driving light switch ... I almost suggested where he could fit it ...

That's funny, I have been chasing the same thing and have been quoted $50, $75, $100 and $150 from different wreckers. Finally found an individual on gumtree parting out an XT who offered me one for $20 but when I asked if he could included the plug and a few cm's of wiring he never replied :shrug:

Japan parts have new genuine OEM ones for 34,000 yen which is about $34 + P&H.

I already have one standard fog light switch which I have rewired for my spotties but I want another one to use for my rear worklight. I have setup the rear light to be a two-way switch circuit (like a hallway) with one switch in the cabin and one on the rear bar hidden under the tire carrier. If I find a factory fog light switch when I can make it back lit and also have an indicator light to tell me when the rear light is on. Very fiddly set up using 5 core trailer wire but well worth the time involved in getting it right as I can turn the rear light on and off from outside the car even with the doors locked ad car turned off. :biggrin:
 
Gidday all

After a good night's sleep, I feel almost sub-human ...

I will ring Brett at Subaru Wreck in Highett - (03) 9555-9333 and see if he has anything suitable.

I recall from somewhere that a brand new driving light switch from a Subaru dealer costs $60.61 ...

Hopefully, today will be lightbar day :poke: :lol:.

Thanks for all the various input so far. Keep it coming. It appears that the wiring is different for many models. Sometimes just a bit, and sometimes a lot.
 
Just got back from doing car and people shopping.

Mostly successful, except for the robber who wanted $34 for a s/h Forester driving light switch ... I almost suggested where he could fit it ...

Subaru Wreck Highett have them for $30 ... (03) 9555-9333, 88 Levanswell Rd, Moorabbin Brett or Lucas.
 
I now have a genuine driving light switch from an earlier model Forester that fits perfectly ...

It's also got a LED, shaped front, with tactile tiny little knobs on the lower part.

There are six wires, one of which does absolutely nothing!

Photos later.
 
Back
Top