how thick is the unibody chassis on sf foresters?

cr445671

Forum Member
Joined
Jul 20, 2018
Messages
66
Location
florida
Car Year
2002
Car Model
forester
Transmission
auto
I've recently discovered that welding up your own bumper could be stupid easy and am wondering if that'd be the thing to work on after I'm done with a few mods slated for this november.

I figure I'd try to tie it into the chassis with angle iron and bolts through the side like i think dedman did on his build, but I don't think I'd want to do so with steel that's thicker than that of the car itself, do any of y'all know how thick the main chassis 'frame' rails are? I would just send @Dedman a pm but apparently he hasn't been on since oct. 2020 so I don't know how well that'll work out.
 
More importantly - How strong is it?

The SF had a single subframe around the bottom of the engine bay. The SG added a second around the top, with bridging sections between them. This, and stronger subframes, made the SG a lot stronger and more rigid.

I think that you would need to reinforce the connection points substantially, and realise that the whole car would still be more susceptible to distortion if subjected to eccentric forces.
 
I'm not talking about attaching it to the subframe, I'm talking about the part of the unibody that the subframe bolts to. There's a little sheet metal cover on the end of it that the stock bumper bolts onto and if you cut a hole in it you can run a piece of angle inside and put bolts into the side of it in the area that's normally blocked by the front of the wheel well, it's more or less the same place that the tow hooks attach.
 
Regardless of where you attach, you have to be aware that the front of the SF is nowhere near as strong or as resistant to deformation as the frame of the SG models.
 
Regardless of where you attach, you have to be aware that the front of the SF is nowhere near as strong or as resistant to deformation as the frame of the SG models.
good to know. i'll prob add a cross brace between the two stock bumper attachment points then.
You should try that as he will receive an email notification ;)
guess that's true, never think of that, here's hoping he checks his email.
 
Hi! Yes I am still here and I am sure a PM would have got to my email ;)
On to your question. I can't remember exactly how thick they are on an SF but I am guessing 1.6mm at most with a few doubled up sections.
Have you watched this video?
Should give you an idea of what I did. I certainly used sections thicker than the original frame.
Unfortunately on the SF the ends of the frame are closed off and the mounting bolts for the bumper are not that strong as the end plates are just spot welded on from memory. This is why I opened it up to slide the sections in.
wow 1/16", really? i would've figured atleast 1/8.
yes I've watched you vid/ am aware of the stock mounting issues.

do you have any other pics of the angle post trim/ of where you've got it bolted to? or maybe just some measurements of how far in you went with it?
is there any reason you mounted it to the inside of the frame internal as opposed to outside? also how flush up against it were you able to get the angle? looking at the pic in your old thread of the inside of the rail inside it seems like even with trimming it'd be hard to do other than with the top section. I wonder if I could weld up a custom I-beam and keep my bolting to the top and bottom to avoid all those spot welded obstructions on the sides, did you ever consider adding frame stiffeners like they do on jeep cherokees (xj), or would you think it's needed?
Yeah its nowhere near 1/8th. In the doubled up sections maybe gets to 3mm but probably not even. Again going from memory probably close to 10 years ago now so don't hold me to it.

The sections went in about 300mm but the full l profile did not go the entire way as there are some internal obstructions to go around.

I got the L section hard up against the top and inner walls of the frame for pretty much the entire inserted length. To achieve this I did have to remove a couple of nuts welded onto the inside of the frame tube.

To mount on the outside of the frame would require some serious hacking up of the front of the car. Inside is far better option plus if it was on the outside you couldnt bolt it up as you cant bolt through the frame without internal frame spacers.

I-Beams could maybe work but IMO would be far more trouble than its worth when an L section is plenty strong enough for the job.

No need for frame stiffeners. If I didn't break the front of that car you wont... Fixing the rear flex in the body is probably more important...
 
To mount on the outside of the frame would require some serious hacking up of the front of the car. Inside is far better option plus if it was on the outside you couldnt bolt it up as you cant bolt through the frame without internal frame spacers.
lol, I meant angle facing in vs out
I-Beams could maybe work but IMO would be far more trouble than its worth when an L section is plenty strong enough for the job.
9312214738_4df7052fde_z.jpg
if I went for internal facing C-beam (prob better than I-beam after thinking about it), then assuming our frames are the same inside it doesn't look like I'd be able to get it much past that first nut there, which I'd assume is going to have me stopping well short of your total insert distance, that in mind, you think either one would be better for the frame itself? That'd be my main goal in going for something other than angle iron, after hearing how thin it is it makes me worry about distributing the load as evenly as I can, so a bit more trouble doesn't bother me if one is clearly better for the frame, if it doesn't make much difference though id def go for the easiest.
No need for frame stiffeners. If I didn't break the front of that car you wont... Fixing the rear flex in the body is probably more important...
any ideas for that beyond a strut tower brace? already have one of them.
 
lol, I meant angle facing in vs out

View attachment 4831
if I went for internal facing C-beam (prob better than I-beam after thinking about it), then assuming our frames are the same inside it doesn't look like I'd be able to get it much past that first nut there, which I'd assume is going to have me stopping well short of your total insert distance, that in mind, you think either one would be better for the frame itself? That'd be my main goal in going for something other than angle iron, after hearing how thin it is it makes me worry about distributing the load as evenly as I can, so a bit more trouble doesn't bother me if one is clearly better for the frame, if it doesn't make much difference though id def go for the easiest.

any ideas for that beyond a strut tower brace? already have one of them.
I think your pictures show why angle in is a better option. The outer wall has all sorts of lumps and bolts on it.

A C-beam could work but it would have to be exactly the right height and would be more difficult to get it to slide in. Again next to no benefit over an angle and a lot of draw backs.
For mine I had 4 bolts on each side holding each angle in. Two from the top and two from the side. Never had any issues with flex or tearing the section etc. Use big washers to spread the load and I used heavy angle, end result is load spread over a large area of material.

As for rear flex I chose to ignore it. By the time I scrapped the car there were some notable panel/seam misalignments though...
 
By the time I scrapped the car there were some notable panel/seam misalignments though...
With what you do to your Subarus I'm not surprised!
Out of interest, did you do a similar thing to your SG? or is the newer body easier to attach a winch to?
 
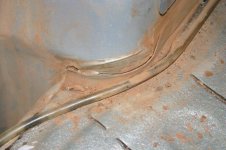
The seams around the rear struts / cargo area floor started to come adrift so had the seams welded. Normally joints are "spot welded" when the vehicle is manufactured but sometimes this is not strong enough for very hard off-roading so the seams are welded in a continuous weld. This is usually done in rally cars where all panel joins are seam welded. It looks like this when the spot welds start to let go:
IMG_7996.jpg
IMG_7998.jpg
IMG_7999.jpg
 
The seams around the rear struts / cargo area floor started to come adrift so had the seams welded. Normally joints are "spot welded" when the vehicle is manufactured but sometimes this is not strong enough for very hard off-roading so the seams are welded in a continuous weld. This is usually done in rally cars where all panel joins are seam welded. It looks like this when the spot welds start to let go:
I'm curious to hear how you went about catching that, do you regularly break your interior down to metal for inspection or something? what sort of shop does that kind of work?
 
@cr445671 It was 13 years ago so the memory is a little hazy but I believe it was the presence of excess dust in the rear that began the investigation; especially as I had blocked off the rear vents as shown lower left in the first pic.
 
Back
Top