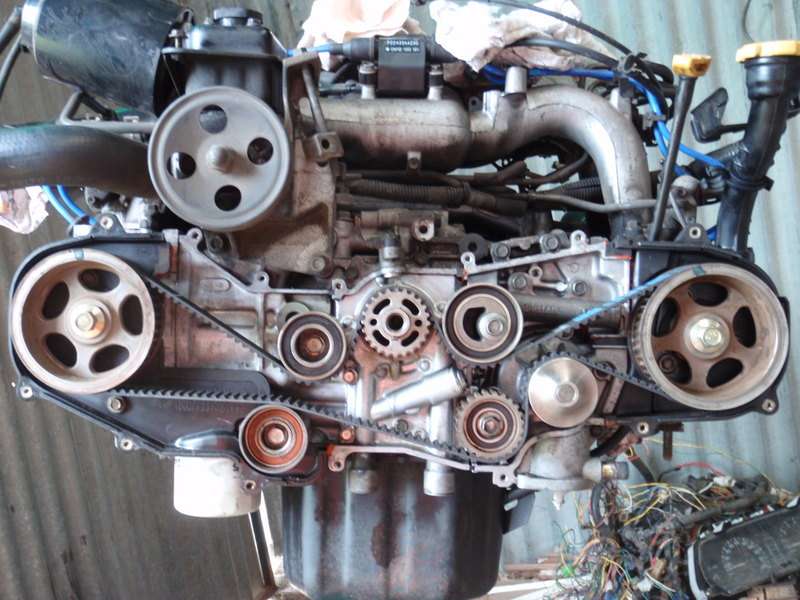
EJ into L series

El_Freddo

Forum Member
Joined
Aug 11, 2008
Messages
2,399
Location
Bridgewater, Vic
Car Year
1988, 1990
Car Model
EJ22'd L series; Targa Brumby
Transmission
Locking FT4wd 5spd Manual, 4.111:1 diff w 1.59:1 low range & front OBX LSD ;)
G'day all!

Few of you know that I'm soon to drop an EJ into my L series. I've been gathering parts for the last 9 months or so, playing with wiring during that time and am now playing with some gearboxes (I'll get into that later).

So I started with some wiring, it looked like this when I got it:

1004960ic0.jpg


After a few sessions of getting my head around the wiring, and with some help of a wiring diagram or two I ended up with this:

ejwiringseperated.jpg


^ The EJ harness that I need is on the right, the stuff I don't need is on the left :D

I have set up my EJ22 in the shed on the floor to give it a run before I pull Ruby Scoo (my daily driver) off the road to fit it. Yesterday I hooked up my cut down loom, got a radiator, battery and fuel sorted, this was the result:

[ame="https://www.youtube.com/watch?v=CUjKbPrZDLM"]YouTube - EJ first test run[/ame]

I was very happy with the result. I now have a tacho working but do not have a temp guage to reference yet - I want to run it for a while to see if I get any codes - I've already got a code 11, something I'll have to find out what it means...

Today I split a dual range EA 4wd gearbox and an EJ AWD dual range box. What I'm aiming to achieve here is Part Time 4wd EA running gear with an EJ casing - this will get around needing an adaptor plate while retaining the original ratios and mounting points so no further modifications needed to Ruby Scoo with exception of the crossmember that will need to be slotted to allow the motor to bolt in.

I just need to sort the diff backlash properly and I should have a goer on my hands (gearbox wise). Then its a case of sorting the wiring into the L and do the mechanical swap. I've also got to get my custom radiator modified to take the 40mm EJ hoses...

Progress might be a little slow from here, I have a few large jobs to complete - and hopefully I don't need to do the head gaskets... Time will tell.

Cheers

Bennie
 
Things have slowed down to a halt in the shed :( The EJ needs a leak at the water pump sorted and a general clean up - I reckon I'll be replacing the water pump and the timing belt while I'm there.

Got the gearboxes split, here's the EA Dual Range 5 speed:

p7011028.jpg


p7011030.jpg


^ The rear housing where the rear drive is engaged to make 4wd happen. If you ever pull this section apart, do it slowly, there are dedent balls and springs in all of these shafts! You will want to know where they go when you re-assemble the box...

p7011039.jpg


^ Subaru love this way of holding things in place - its neat and easy too

p7011046.jpg


^ Rear housing removed - note the gear on the end of the shaft, I'll talk about that later.

p7011047.jpg


^ Driver's side (Aust driver's side) EA casing. Here you can see the low range gears, half of them anyway. These are also held in place by the pin in the hole trick and are rather easy to remove once you work out where they're hiding (I think there's three from memory)

p7011048.jpg


^ Australian Passenger's side casing with all the gearing etc in place.

I got a Gen 2 liberty box that is also a 3.7 ratio final drive, which appaerntly means that the forward gears are the same ratio as this box, just the speed gearing is different. Here's the EJ AWD box's rear casing showing the centre diff and rear outputshaft above it:

p7011049.jpg


p7011055.jpg


^ This is the EJ AWD gearbox split open, aussie passenger's side again. Notice on the lower shaft there is no gearing on the end at the rear like the EA box has - this is to fit the centre diff on, where as the EA is a part time 4wd box and the gear it has on the end is for the rear drive output once its engaged...

It is really interesting how subaru have worked out their AWD system - the lower shaft in the box has the pinion shaft going to the front diff and to the rear to mount to the centre diff. On all of that they have the lower gearset fitted over the top of the pinion shaft! Those little buggers really have it sorted.

So the plan now is to swap over the internals from the EA gearbox into the EJ casing with the EA low range gearsets and the EA speedo gearing too. This will allow me to bolt the gearbox straight to the EJ motor without the need for an adaptor plate - which would need an engineer's approval to do. I will then be able to retain the original gearbox crossmember and mounting points, so again, a bolt in application...

Progress will be slow slow slow :neutral:

Cheers

Bennie
 
Hey, is there a missing pic? Perhaps the last one of the EJ gear box split open?

I envy you this project El_Freddo.:biggrin: I love working on my own stuff, but I think this would be over my head. Sounds like it may take awhile, but the end result will an unstoppable off-road Subie machine.:cool:

Staying tuned...
 
I would be totally lost if I tried doing something like that. :o :huh:
I wouldn't even know where to start. :shrug: :confused:
What a beast it will be when it's finished. :raz:


Regards
Mr Turbo
 
Thanks fellas!

I don't think its that difficult - I am learning about adjusting backlash etc, that's not so fun otherwise it would really be like leggo!

Here's an update (no pics sorry): I got a new water pump and timing belt. I pulled the water pump off to find it in next-to-perfect condition but had developed a leak past the seal. So that'll go back on with some high temp silicone to help seal it up.

I'm thinking of putting the EJ on an engine stand to give it a bit of a clean up and seal up the cam covers. I'm also going to do the front and rear main seals as a precautionary. There's a little bit of oil residue under the cam gear of the crankshaft - this is what got me thinking about replacing the oil seal, just need to work out how to remove the cam gear without damaging it in the process.

The gearbox: I left the cases to soak in a solution of degreaser - they were there longer than I wanted (lack of time to pull them out) and have started to grow some corrosion spots on the alloy. After I finish up here I'm off to the shed to give them a wash down with some kerosene and a paint brush. I managed to stuff up the dedent balls on the gear selectors - so out they came too... fun fun.

I've also created quite a mess that needs to be cleaned up - just parts spreading out between the gearbox work area and where the engine is located.

Cheers

Bennie
 
Interesting to see the pictures of the internals of the two gearboxes.

I had often wondered how they drove the front diff on manual full-time 4wd subarus when the centre diff is at the back of the gearbox - your comments prompted me to do a bit of research. You're right, it's neat how the pinion shaft is inside the lower shaft. I would love to have been at the meeting where they came up with that!

Will continue to watch your project with interest!
 
props to this. down the road (probably not until after i graduate) i intend on getting an older roo or maybe an AMC Eagle (sx4 if i'm lucky) and having it as a little fun project car :P
 
Today I washed the gearbox cases with some kerosene. They came up tops:

p7231371.jpg


p7231370.jpg


This is the corrosion that had started while in the bath of degreaser:

p7231369.jpg


I got the engine up onto an engine stand, this made things easier to do with the added bonus of being able to turn the motor around 360 degrees.

p7231368.jpg


Since the gearbox casings were still wet and I had the stuff out to clean, I decided to start cleaning up the engine. This is what it looked like before I started, I don't have a finished photo yet (cos its not finished):

p7231367.jpg


I've got the cam cover off with the seal area cleaned up ready for some high temp silicone to seal it back up again, hopefully this time without any oil leaks - this side had quite a leak when the engine was tested...

Tomorrow I'll grab new oil seals for the crank and cams, a tube of high temp silicone and get stuck into the gearbox rebuild (hopefully without any problems doing it) if I'm not working.

Cheers

Bennie
 
LousyPirate: If you go down the route of a subi project for offroading, hunt around and grab an L series RX turbo AWD gearbox usually found in the RX II coupe. These gearboxes have a lockable centre diff which is superior offroad to a standard AWD box found in the EJ series subarus. You're lucky in that the US got them, where as in Oz we didn't and as such they're rare as rocking horse ****!

I don't know the vehicle you listed above, I'm a holden or subaru man who also dabbles a little in old school mini's ;)

Cheers

Bennie
 
L series RX turbo AWD gearbox usually found in the RX II coupe. These gearboxes have a lockable centre diff which is superior offroad to a standard AWD box found in the EJ series subarus.

I love those cars!!! Not too many of them around anymore.:sad: They do have the lockable center diff, but what they don't have is the lo-range. Would still be cool for an off road project though.

08sm.jpg
 
I love those cars!!! Not too many of them around anymore.:sad: They do have the lockable center diff, but what they don't have is the lo-range. Would still be cool for an off road project though.

08sm.jpg

Smart arse! I'm sooo jealous right now!!! The gearboxes with the lockable centre diff that I've seen/heard of have all been dual range with exception to one that came from a vortex...

In other news I had a Splendor in the Shed day today - hopefully it'll continue all weekend...

Here's today's effort: I got some oil seals for the camshafts and the crankshaft. Glad I did, when I took off the first cam gear (driver's side) this is what I found:

p7241372.jpg


For the passenger's side, I took off the block that mounts to the head, its literally a spacer (for those that haven't had their EJ apart). I didn't get a photo of the silicone on it when I put it back on but this is what it looks like without the silicone:

p7241374.jpg


The new seal before it was properly installed:

p7241375.jpg


If its possible, this is how I usually tap the seals into place - it doesn't always work due to shaft length. Just make sure you take it nice and slow otherwise you can compress the seal:

p7241376.jpg


The seal installed: I did compress it a little bit but I'm sure it will be fine - if not I'll have an oil leak...

p7241377.jpg


Here's the cam covers cleaned and re-sealed. The first one is the driver's side; I showed a photo of this before I started cleaning in an above post:

p7241379.jpg


p7241383.jpg


This is the front of the engine after being cleaned up, seals installed and the water pump cleaned, sealed and re-fitted; its looking really good:

p7241382.jpg


That's about all I got done today on the mechanical package. When I got the seals I also picked up some boots for the power steering rack, ordered some new tie rod ends then closer to the swap date I'll get a pair of new ball joints too. I'm thinking of replacing the bushes on the front end while its all apart - its just $$$ that I'll need to find.

Tomorrow I'm hoping to work some stuff out on the gearbox - the backlash, which could take some time to do... fun fun. Before that I'll get the timing belt on then the covers, the engine will be done apart from a rear oil seal which I can't do while its on the engine stand.

I must say that it feels good to be able to see some progress - especially after the set back of having to wash the casings again to rid them of the corrosion spots...

Cheers

Bennie
 
Smart arse! I'm sooo jealous right now!!! The gearboxes with the lockable centre diff that I've seen/heard of have all been dual range with exception to one that came from a vortex...

I'll have to look again next time I see one (doesn't happen to often), I remember seeing the diff switch but no low range lever. I might be able to find you one.:iconwink:

Loving watching your progress too, keep up the posting.:bcool:

:bananatoast:
 
The gearboxes with the lockable centre diff that I've seen/heard of have all been dual range with exception to one that came from a vortex...

I stand corrected!!! '85, (no listing for '86) '88-'89's did have the dual range tranny. You have to scroll down quite a bit to get to them, but sure enough there they are.

Now I just have to get my hands on an RX and build an off road beast!!!:twisted:
 
I stand corrected!!! '85, (no listing for '86) '88-'89's did have the dual range tranny. You have to scroll down quite a bit to get to them, but sure enough there they are.

Now I just have to get my hands on an RX and build an off road beast!!!:twisted:

You might even find that the early (pre 87) subi's are 3.9 ratio with the later units being 3.7...

On the conversion front I had a good day yesterday (saturday). After a late start I got all of the cam covers and the cam belt on. We had a bit of fun with the hydrolic tensioner, that took some time! I also took the sump off to re-seal it.

Then I got on the sauce last night a little heavier than I wanted :( So today was a "relaxation" day...

Pics later.

Cheers

Bennie
 
The new seal before it was properly installed:

p7241375.jpg


If its possible, this is how I usually tap the seals into place - it doesn't always work due to shaft length. Just make sure you take it nice and slow otherwise you can compress the seal:

p7241376.jpg


The seal installed: I did compress it a little bit but I'm sure it will be fine - if not I'll have an oil leak...

p7241377.jpg


Cheers

Bennie

Hey El_Freddo

Did you put a bit of grease on those seal lips when you were installing them? Some of them have little springs around the back to ensure the lip is sealing the shaft and I have found that if you don't grease them there is a chance the spring will come off and seal will leak in a reasonably short while...

Also, I see a thread at the end of the shaft. Couldn't you use a screw to drive your socket/seal-driver down, instead of using a hammer?

Keep the photos coming as obviously everyone is keen on checking your progress.

Cheers,
Pedro.
 
Did you put a bit of grease on those seal lips when you were installing them? Some of them have little springs around the back to ensure the lip is sealing the shaft and I have found that if you don't grease them there is a chance the spring will come off and seal will leak in a reasonably short while...

Also, I see a thread at the end of the shaft. Couldn't you use a screw to drive your socket/seal-driver down, instead of using a hammer?

No grease on those seals Pezimm. So far I have not had problems with the ring spring coming off - if I get a leak I'll be pointing at you for jinxing my seals :poke:

I hadn't thought about using a threaded bolt to push the seals in, I've always used a hammer with some gentle tapping. In those pics the bolt I have for that threaded section would've been too short...

Here's what I did on saturday in picture format with some commentary:

I cleaned up all the cam covers, threw some silicone on the covers to help seal them up (over the top I know) and tried my hand at some "art":

p7251385.jpg


The hydrolic cam tensioner that took so much time, this is how we compressed it, the following photos show how we held it in place while it was being fitted and how much extension had occured after the pin was pulled - placing the tension on the cam belt:

p7251384.jpg


p7251387.jpg


p7251388.jpg


p7251389.jpg


And this is what a Single OverHead Cam EJ motor looks like with the cambelt installed and tensioned:

p7251390.jpg


^ interestingly the cam belt runs the water pump, a pretty good design idea I think. The water pump wheel is the small wheel on our right that is closest to the cam gear on the inside of the belt.

Finally all sealed up:

p7251395.jpg


The artistic idea:

p7251397.jpg


The sump removed and the bottom of the block cleaned up for re-sealing - no gasket used here:

p7251404.jpg


Sump re-installed after being cleaned up too:

p7251406.jpg


The excess that will be cut off next time I'm in the shed:

p7251407.jpg


The gearbox is awaiting the result of a search for a seal kit, otherwise its ready to go back together. Its quite exciting to see it sitting on the bench ready to be put back together... I have to resize the image as I forgot to drop the resolution size before I went happy snappy.

I had some time at work to organise some time allocation to each task I need to do - I reckon if I had 7 days of no-interruptions the EJ would be in and running by the end of that time.

Cheers

Bennie
 
Here's the gearbox waiting on the bench for a seal kit - looks like I've gotta go genuine to get a quality kit:

p7281495.jpg


Today I cleaned up the powersteering rack and the engine crossmember that the EJ will mount to, these came out of the '84 L leone parts bomb:

p7281473.jpg


p7281474.jpg


I got working on some wedges for the difference between the crossmember and the EJ engine mounts - I didn't want to create my own so started thinking about where I could find an appropriate wedge, so I checked out the old holden's steering column where there's a wedge used in there. Two of them were sourced from other parts cars and I got working. Here's the progress images as I was trying to nut it out:
Difference in the two parts:

p7281480.jpg


The wedge before it had some shaving:

p7281483.jpg


The two wedges, one in original condition, the other shaved - I took more off after this pic:

p7281484.jpg


This is one of the wedges fitted, some BFH work removed the little bump at the top of the engine crossmember to make it flat inline with the mounting face for the engine mount:

p7281485.jpg


I replaced the boots on the steering rack while I had easy access:

p7281489.jpg


The rack and engine mount fitted to the EJ:

p7281490.jpg


With the alternator and AC compressor pump fitted and the PS lines connected to the PS rack (not that you can see this):

p7281494.jpg


If I'm not working tomorrow, I'll start cleaning up the shed for the shuffle so I can start pulling bits off Ruby Scoo while I wait for the gearbox seals to arrive. I've got baz to drive now - and I also found out that Ruby Scoo has done a CV boot on the outter front right as well as a nasty oil leak, I think its from between the head and the block... fun fun.

That's it for now.

Cheers

Bennie
 
The strip show begins

Friday, Ruby Scoo was backed into the shed after any area had been cleaned up to fit her in. That afternoon I'd got the guards and front bar removed. I also got the seats and console out and was a few wires short of pulling the dash out too.

p8031568.jpg


The dash, fan, AC and heater box removed:

p8031570.jpg


Saturday I got the dash out after sorting Baz (sister's L) for me to drive while Ruby Scoo's off the road.

Yesterday (monday 3rd aug) I pulled the wiring out - I'm replacing the loom with one that has not been changed from factory. I spliced two looms together when I originally converted to MPFI EA82. This will give me central locking on the rear tailgate too. The tailgate wiring, I couldn't have done it without my mate Jim who knows how to pull wiring through tricky spots, it took some time but now its done.

After that was sorted I wanted the floor pan to dry out, its still very moist with quite a bit of mud that needs to be cleaned out (next job to do). So in the meantime I'm shoving power windows, mirrors and central locking. This is a lot more involved than I previously thought. To get the central locking I need to take the whole locking mechanism out, to get that out I need to remove the door handle, to remove the door handle I have to get the glass out, to get the glass out I have to take the side mirror and it's support panel out which only leaves the window runner guides in the door... It'll be worth it though. Here's the driver's door gutted:

p8031581.jpg


And this is the mud at the bottom of the door sill channel:

p8031579.jpg


For the power windows I'm using an MY system as I prefer the location of the switch panel - on the centre console. To do this I have to play around with the door wiring to remove the L series system, while I'm at this I'm incorporating the speaker wiring. I have a hurdle or two to overcome with the fitting of the centre console, its do-able but will need some work to mount it properly.

This is the wiring that is to go in (L series MPFI from a 91 touring wagon) after the floor pan has been cleaned up.

p8031571.jpg


^ This may look messy but its pretty simple once its spread out - until you're looking for one wire, then it gets tricky... The EJ ECU wiring will be laid out over the L wiring once its installed, then I'll splice the appropriate wires together and tape it all up. By then the interior should be ready to go back in.

For now, mechanically, I am still waiting on the gearbox seals - the EA82 will stay in until the EJ unit is ready to be put in. It will be all go from there (can't wait!). Hopefully the seals will be in today or tomorrow, I've also got a set of drive shafts on order.

That's it for now.

Cheers

Bennie
 
Friday, Ruby Scoo was backed into the shed after any area had been cleaned up to fit her in.


Mate,

Quite frankly, it seems to me your project is starting now... I know you've done a lot of prep work to ensure everything from now on went smooth and I really hope it does! But it's just that thing about not having your daily drive until you finish... that "no turning back" feeling, you know...

I'm sure it will look, sound and feel great when it's finished, still good luck in your surgery and have heaps of fun!

Cheers,
Pedro.
 
Back
Top