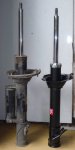
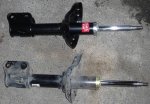
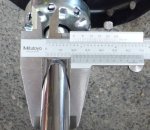
I replaced my current struts with a slightly taller strut... you'll see what I mean by the before and after shots... the main reasons being to get an extra 10-15mm of ride height and also give extra clearance between the tyre and strut seat spring to allow a higher profile tyre... 215/75-R15 BFG A/Ts to be precise.
Jack the vehicle. Lower onto stand and remove wheel. Place jack under the hub pushing the strut, compressing the spring with the weight of the car allowing you to secure the spring in a compressed state so you can get it on the new strut. We used some tie wire looped 4 times and a cobb & co twitch to lock it off. Originally we just released the strut in the ground and realised our folly. So we compressed it between some firm ground and the tow bar by lowering the car down on to it, wired it up and it was easy to re-assemble the new strut. Second strut we got smart with the first solution offered here.

Remove the sliding clip that holds the brake line onto the inside of the strut. Needs just a little tap up and towards the rear. Then after holding the brake pedal to the floor using something like a broom stick remove the brake line from the rear of the hub. Just a little leakage so we bled the brakes after the job was done.


Undo the two main 19mm bolts that hold the strut to the inside of the hub. I used a solid bit of pipe to crack em.
Once we got the nuts off we left the bolts in for some support to work on the top.
Remove the top plastic cover inside the vehicle and revealing the 3 top strut bolts and nuts. I made an arrow pointing to the outside of the vehicle but there is a 'out' marked with a line so you can orientate it correctly for the re-install.
I suggest you crack the main strut nut whilst it is still in the car. Just saves a heap of hassle as its a bit of a wrestle outside the car. We used the stock Forester Wheel wrench with my old matey long pipe again.... drop the seats and swing like a mofo. At this point I'll point out that I have a strut lift so we had to remove the strut complete, remove the strut lift block and put it back in.


See Part 2.... https://www.offroadsubarus.com/showthread.php?t=350
Jack the vehicle. Lower onto stand and remove wheel. Place jack under the hub pushing the strut, compressing the spring with the weight of the car allowing you to secure the spring in a compressed state so you can get it on the new strut. We used some tie wire looped 4 times and a cobb & co twitch to lock it off. Originally we just released the strut in the ground and realised our folly. So we compressed it between some firm ground and the tow bar by lowering the car down on to it, wired it up and it was easy to re-assemble the new strut. Second strut we got smart with the first solution offered here.
Remove the sliding clip that holds the brake line onto the inside of the strut. Needs just a little tap up and towards the rear. Then after holding the brake pedal to the floor using something like a broom stick remove the brake line from the rear of the hub. Just a little leakage so we bled the brakes after the job was done.
Undo the two main 19mm bolts that hold the strut to the inside of the hub. I used a solid bit of pipe to crack em.
Once we got the nuts off we left the bolts in for some support to work on the top.
Remove the top plastic cover inside the vehicle and revealing the 3 top strut bolts and nuts. I made an arrow pointing to the outside of the vehicle but there is a 'out' marked with a line so you can orientate it correctly for the re-install.
I suggest you crack the main strut nut whilst it is still in the car. Just saves a heap of hassle as its a bit of a wrestle outside the car. We used the stock Forester Wheel wrench with my old matey long pipe again.... drop the seats and swing like a mofo. At this point I'll point out that I have a strut lift so we had to remove the strut complete, remove the strut lift block and put it back in.
See Part 2.... https://www.offroadsubarus.com/showthread.php?t=350
Last edited: