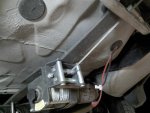
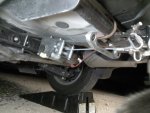
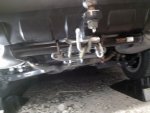
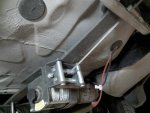
Viejopedorro's 2012 X 5mt hitch receiver and winch.

Viejopedorro's 2012 X 5mt hitch winch cargo mods

The ride is called La Tortuga. Haven't had her long--just got her first oil change at the stealership. She gets three for "free," then its back to DIY maintenance and Jiffy-Lube style oil changes for El Pedorro.

La Tortuga's first mod was a Curt 1-1/4" (3cm) hitch receiver.

Second was a Harbor Freight (cheap) 3000lb winch, with about 12 feet (4M) of #4 (8mm) insulated cable from stock battery location to the spare tire tub area, and a 6' (2M) "remote" in/out switch and its relay box. The winch is mounted under the spare tire tub, exposed to the elements but hidden from view and well within the departure angle from bumper to tire contact area. The 12V supply wires exit the spare tire tub through one of two existing 2" (50MM) grommets at the rear of the tub.

Fabrication of the mount was straightforward, and required only one weld. I purchased a 3/8" x 2" (10mm x 50mm) mild steel bar 36" (95cm) long, and cut a short distance off so that it would rest atop the differential subframe and reach within 2" (50mm) of the front of the hollow square tube that is the hitch receiver. I found an unused 1-1/4" hitch drawbar and cut a short section from it. This I welded to the top of the flat bar stock for insertion in the hitch receiver. I placed a short 1/2" (13mm) bolt, nut and lockwasher in the hole in the section of drawbar to secure it against winching loads. Thus, no front-rear loads are transferred to the subframe. Side-to-side and vertical loads are minimal.

I bent the 3/8" bar into a very shallow Z-shape so that it was level where it rested on the subframe, sloped downward slightly to pass just below the spare tire tub, and became level again where the square extension could be inserted in the hitch receiver. Bending was done with a pair of wooden blocks and a BFH.

After trial fitment of the heavy bar and its little hitch drawbar, I finally drilled it for a 1/2" (13mm) J-bolt in the front to secure it to a handy hole in the subframe and chose a likely spot to drill winch mounting holes in the sloping portion of the shallow "Z", somewhat toward the front of the spare tire tub.

The short leg of the J-bolt must be tapered to about 3/8" (10mm) to fit the holes in the subframe. The winch must be mounted on the bar, upside down on the lower side, before final fitment, as there was no room to insert the bolts between the bar and the spare tire tub. YMMV

After final fitment of the winch and its mount, it took little time to connect wiring, ground the winch to the LH strut mount, and try it out. El Pedorro ran out the cable to his "current bush" (power pole) and looped it around. On a direct pull, the cheap little winch was able to slide the car on loose gravel with the parking brake on. With a snatch block, it should be easily able to extract La Tortuga from being stuck in snow, sand or mud, provided that El Pedorro hasn't buried her to the frame (if she had one).

I have photos now but can't seem to attach them with the IPAD. I will have to open my office (an otherwise unused camping trailer) and fire up the laptop, I guess.

"Photos Coming Soon"

El Pedorro
 
Last edited:
The ol' man finally learned how to get files from cellphone to email to laptop to ORS. This is not trivial.

Anyhow, in the order I attached them, are:

a. A close shot of the undeside of the spare tire tub area where the winch is mounted. The spool is so neat because the photo was taken before testing.

b. A wider shot of the underside to include the connection with the forward side of the hitch insert, as well as the aluminum hawse I mounted to the round hitch frame with muffler clamps (poor folks has poor ways lol).

c. A shot from the rear of La Tortuga with her skirts raised, showing the hitch area, hawse, and a shackle I use to secure the winch cable for transport.

I have the snatch strap, equalizers, extra shackles, snatch blocks (2) and some tent pegs I use for belaying pins to keep the straps from knotting up, all in a bag in the car. They take up surprisingly little space.

More photos to come now that I have broken the dam. Next: the roof pod, bazookas and a grab handle to lever El Pedorro to the roof at the rear of the car.

Thanks for waiting, ladies and gents.
 

Attachments

  • 2012-09-17 21.13.05.jpg
    2012-09-17 21.13.05.jpg
    89.7 KB · Views: 63
  • 2012-09-17 21.11.35.jpg
    2012-09-17 21.11.35.jpg
    88.7 KB · Views: 60
  • 2012-09-17 21.16.08.jpg
    2012-09-17 21.16.08.jpg
    90.2 KB · Views: 49
Viejopedorro's 2012 X 5mt roof pod, bazookas and access

La tortuga gets her name from the Pep Boys (auto parts chain) roof pod up on top. I regard it as being mounted permanently, and have added 36" (95cm) perforated straps internally to prevent "tin-canning", to reinforce the floor, and to allow me to carry it empty if I wish. The straps extend from the forward mounting point to the rear on each side, inside the pod on the floor, and have one bolt added in between the two existing mounting points.

As companions to the roof rack, I added two 4" (110mm) PVC bazookas of the thinnest DWV stock that our local lumber store had. These are painted Krylon Fusion black and tied down with black wire-ties per other posters on the Subaru sites. I have tent poles in one already to hold up a Hurricane Katrina blue tarp the old cheapskate uses for an awning at the beach:lol: . Fishing poles later.

I found myself using the pod quite a bit because it hides things from view of those who are tempted easily. It got to be a pain to clamber from the ground to the trailer ball to the bumper and to balance myself there by fingertips wedged into the crack between the hatch and the roof. Unsafe to say the least. I also found myself tempted to scratch the top of La Tortuga's hatch by resting items there as I hung on for dear life with the fingertips of one hand while I rummaged in the roof pod with the other.

So, I conceived a light-duty grab handle made of 6" (150mm) of heater hose, two short rings cut from the same hose, and about 24" (60 cm) of discarded nylon cargo strap material. The strap is passed through the hose which is above the hatch and roof, and then through the space between them where it is knotted through the rings to keep it in place when the old boy levers himself to the roof and hangs on to rummage all he wants in safety. All materials are soft on don't scratch the paint.

I also picked up a "tread-safe" patch of adhesive-backed rubber intended for pickup truck bumpers, and stuck it to the top of the hatch. It's not visible from the ground, does no damage itself, and protects the top of the hatch if I need to rest a briefcase or my roller skating helmet bag there, so I am free to rummage in earnest.

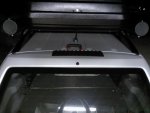
The photo attached is of the rear area showing the pod, bazookas, grab handle and rubber pad. Hope these ideas are of some use.

El Pedorro
 

Attachments

  • 2012-09-17 22.18.30.jpg
    2012-09-17 22.18.30.jpg
    88.8 KB · Views: 49
Thanks, Gents. More coming.

El Pedorro is hatching the idea of converting a "fitzall" rear hitch to the front of La Tortuga for the primary use as a towbar baseplate. He wants to haul La Tortuga behind his motorhome when he takes a trip to Missouri and Montana the next time gas prices lower (not likely). Secondary uses of such a setup would be a winch mount, a front hitch (very useful) and hefty iron for mounting a DIY bash plate.

El Pedorro had great success mounting (and using) such a hitch to the front of his previous DD, a dimunitive 2003 Chevy Tracker 4wd 5mt ragtop. He misses that little buggy, but the Subaru is a BIG strep up. The Tracker's winch, also 3000LB, is mounted on a hitch bar already and currently fitted to the front of the small tractor that El Ranchero (another personality) is using to clear mesquite trees and brush on one side of the Ranchito. That winch is cruder and heavier, and uses heavier cable than the smaller one tucked under La Tortuga's tail. But it is there....

Thanks for your ideas, everyone at ORS. I have boldly and shamelessly stolen several already.

El Pedorro
 
viejopedorro's thoughts on front winches for Subies.

Front winches and iffy mounting points have bothered El Pedorro every night for the couple of minutes it takes him to begin sawing wood. He may have a idea for reinforcing the mount.

Winch loads are front-to-rear or rear-to-front. It seems to me that a well-mounted front hitch can handle many times the vertical and lateral loads of winching, but is very weak in resistance to forces that pull from the front.

On the other hand, the rear hitch is quite capable of handling all the loads involved. Why not connect one hitch to the other?

La Tortuga's underside is quite busy near the centerline, but relatively free of obstructions a little more outboard. One could connect cables with turnbuckles from the outboard ends of front and rear hitch receivers, thus relieving stresses of towing and winching loads at the mounting points of both.

What do you engineers think?

El Pedorro, one-time tractor mechanic and current Ranchero in retirement.
 
Viejopedorro's 2012 X 5mt sleeping platform/cargo blind

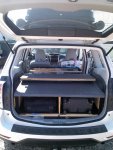
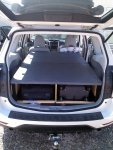
El Pedorro, with help Chase Keester (his roller derby personality) and the Dryland Sailor (his Coast Guard Auxiliary self), has put together a cargo blind/sleeping platform for La Tortuga. It is based on a a rear box that fits between the rear seat backs, the fenderwells and the closed rear hatch, but which can be lifted out the open hatch. It was constructed to be nearly level from front to rear, which made it necessary to make the rear higher than the front due to La Tortuga's sloping construction. Chase said that his roller skating luggage hadda fit, so the height question was settled with that as the minimum. Please see THE FOLLOWING POST FOR THE CORRECT PHOTO.

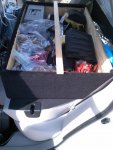
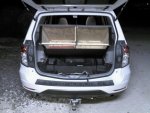
El Pedorro wanted a removeable tray to hold his off-roading paraphanelia. He sized it so that it would fit front-to-rear on the stowed rear seat backs and between the side-to-side coachwork at that level. He chose its height to just touch a straightedge laid along the top surface of the rear box and extending to the front, allowing for the thickness of plywood used in construction. Please see the tray in its place in the second photo.

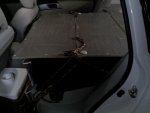
He wanted everything to be covered and out of view when the hatch and doors were closed, but wanted ready access to the rear box as well as the removeable tray. He got the desired result by measuring from just to the rear of the front seat backs at their rearmost but upright, to the forward side of the rear box, and making two plywood leaves of half this distance. The first leaf was piano-hinged to the front top corner of the rear box so that it could fold back. The second was hinged to the first, but so it could fold downward. The width of the leaves was chosen to clear all coachwork as they were folded Z-fashion front to rear to rest on top of the rear box. The third photo shows the leaves assembled and folded back, but propped up a little for illustration. The fourth photo shows the leaves unfolded so that the platform is level from front to rear and supported by the removeable tray.

Securing the platform and its contents was left up to the Dryland Sailor, who specified miniature mooring cleats and 3/8" (8mm) twisted line, all secured to stock tiedowns aft and forward outboard seat belt loops forward. The rear box has but two cleats, placed halfway between the fore and aft ends, which are very nearly placed at La Tortuga's tiedowns. That box is going noplace, says the Dryland Sailor. The removeable tray is secured using its carrying handle which is screwed on with a strong bracket, using a line from the tiedown behind the rear seat, to the handle and around it, and finally to the forward outboard seatbelt loop. The tray is going nowhere either, but the contents could fly around. The Dryland Sailor added a cleat to the rear edge of the forward platform leaf, which is also secured to the forward outboard seatbelt loop. He plans another at the forward corner very soon. The tiedowns as they exist are also shown in the fourth photo.

Access to the spare tire tub is accomplished by removing Chase Keester's skating luggage, casting off the Dryland Sailor's rearmost lines only, and lifting both the rear box and the spare tire cover. An S-hook and a half-meter or so of 1/4" (6mm) line secure box and cover to the baby-seat seat-belt hook at the top of the open hatch. This method works whether the seats are stowed or upright, a pleasant but accidental result. Please see the last photo. The wires visible are the winch control and the trailer light wiring.

Building the platform took several evenings.
Screwing around with uploading, emailing, and downloading 25 photos took a couple of hours. Writing the post and uploading the selected photos ate up another hour, not counting the mistake.

Goodnight, ladies and gents.

El Pedorro, with assistance from Chase Keester and the Dryland Sailor.
 

Attachments

  • 2012-09-12 15.43.48.jpg
    2012-09-12 15.43.48.jpg
    89.5 KB · Views: 29
  • 2012-09-12 15.52.25.jpg
    2012-09-12 15.52.25.jpg
    92.5 KB · Views: 31
  • 2012-09-12 15.54.31.jpg
    2012-09-12 15.54.31.jpg
    92.4 KB · Views: 32
  • 2012-09-17 22.09.11.jpg
    2012-09-17 22.09.11.jpg
    88.9 KB · Views: 30
  • 2012-09-17 22.05.49.jpg
    2012-09-17 22.05.49.jpg
    90.6 KB · Views: 39
Last edited:
Thanks for the photos. I like the folding Z idea, and it's always nice when you accidentally discover a useful feature like holding up the spare wheel cover via the baby seat attachment. I do the same thing with my drawer system. They tilt upwards allowing easy access to the spare without having to remove anything.
 
Good job. Wish I had the $$$ to do drawers, but its gotta wait. I'm just glad to have everything outta sight, and to have a place to snooze.

Gonna try it out this weekend a few hours away in Port Lavaca, TX. More US Coast Guard Auxiliary training. It was sure an honor to be invited to join.

El Pedorro, alias the Dryland Sailor
 
Cable through cabin to rear winch

El Pedorro needed to power his rear mounted winch, and had thoughts of a second battery in mind. All ideas here are stolen or borrowed from ORS and SubaruForester.

El Pedorro's alias, El Ranchero, found a 25' reel of #4 battery cable for cheap at Tractor Supply.

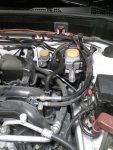
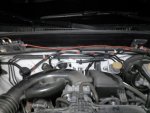
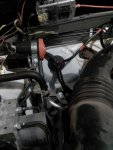
El Pedorro took possession of the reel and got to work. He first ran a short cable from the positive batt terminal to the recommended 50A fuse mounted on the passenger air intake housing above the firewall. (PHOTO 1 NEXT POST) (El Pedorro wrapped the black cable with red tape every few inches to remind himsel that this one is hot. Helps pick it out in the photo, too.)

He then ran a continuous cable from the fuse block through the grommet in the passenger footwell (PHOTOS 2 & 3), under the passenger mat, along the tranny hump, across it, under the driver's seat, along the LH rear doorsill, behind the LH rear seat, and into the spare tire well at the forward LH corner. The connections there are well described in any winch manufacturer literature.

El Pedorro chose the optional "remote control" relay with a long cord.

Finally, he ran power wires for the winch through the 2" (50mm) grommet at the RH rear corner of the spare tire tub (PHOTO 4)

NOTE: El Pedorro became a contributing member just to add his photos.
 
Last edited:
Finally: Power Cable Photos

So the website appeals to ones ego and charges for the privilege of adding photos. Where does this end???

Anyhow, as a junior but contributing member, El Pedorro has added exterior photos of his power cable from battery to fuse panel to grommet to cabin to spare well to grommet to winch. Not much on the interior because you gotta pick a route and you gotta connect your particular winch by its instructions.

Enjoy!

El Pedorro, alias .....
 

Attachments

  • 2012-09-12 21.33.21.jpg
    2012-09-12 21.33.21.jpg
    91.4 KB · Views: 35
  • 2012-09-12 21.35.01.jpg
    2012-09-12 21.35.01.jpg
    89.2 KB · Views: 34
  • 2012-09-12 21.30.16.jpg
    2012-09-12 21.30.16.jpg
    88.3 KB · Views: 30
  • 2012-09-17 21.13.05.jpg
    2012-09-17 21.13.05.jpg
    89.7 KB · Views: 31
I don't think you need to be a paid member to add photos, but welcome to the elitist society of contributing members.
 
Thanks, Stilson. Are you old enough to know what a Stilson wrench is?

Anyhow, the attachment manager said I didn't have the space to add one more photo.

Maybe I should settle for fewer pixels.

El Pedorro and aliases
 
I moonlight as a plumber occasionally but I am a Fridgie by trade. I have pipe wrenches by Rothenberger and Dowidat both of wich I refer to as stilsons. I will buy a nice pair of genuine Stilsons when I have a more disposable income just for ****s and giggles.
 
Back
Top