Sooooo I found this car when I was looking for a pressure washer on the Facebook marketplace right when that feature was added for $200 over a year ago, the things that sold me on it was not the fact that the motor would barely stay running and smoked like no other car I've ever seen and a brand new Weber... It was the mounds of spare parts it came with, spare FWD tranny, EA71 block, complete spare EA81, Boxes of brand new parts, wheel bearings, balljoints, brakes, etc..


You are using an out of date browser. It may not display this or other websites correctly.
You should upgrade or use an alternative browser.
You should upgrade or use an alternative browser.
1981 DL Hatch 4WD EJ22 Swap
- Thread starter andymccauley
- Start date
- Joined
- Nov 21, 2016
- Messages
- 53
- Location
- portland OR
- Car Year
- 81
- Car Model
- DL
- Transmission
- Manual 4spd
This guy doing the work with his mill

Finished product

Finished product
Last edited:
- Joined
- Nov 21, 2016
- Messages
- 53
- Location
- portland OR
- Car Year
- 81
- Car Model
- DL
- Transmission
- Manual 4spd
So this thing is pretty much ready now, I planned on dropping it in today but then realized I needed to reseal the oil separator plate and wrist pin access plate too and I forgot I needed to get a couple bits for impact driver to get them off... Searched and finally got some at Home Depot, they only had 2 luckily I got them both cuz 1 broke after the 6th screw.
But got all that sealed and tight now it's ready to drop in.

But got all that sealed and tight now it's ready to drop in.
- Joined
- Nov 21, 2016
- Messages
- 53
- Location
- portland OR
- Car Year
- 81
- Car Model
- DL
- Transmission
- Manual 4spd
Wasn't the most enjoyable engine install but it's in after alot of adjusting. Actually fits in there pretty well.


El_Freddo
Forum Member
- Joined
- Aug 11, 2008
- Messages
- 2,399
- Location
- Bridgewater, Vic
- Car Year
- 1988, 1990
- Car Model
- EJ22'd L series; Targa Brumby
- Transmission
- Locking FT4wd 5spd Manual, 4.111:1 diff w 1.59:1 low range & front OBX LSD ;)
Wasn't the most enjoyable engine install but it's in after alot of adjusting. Actually fits in there pretty well.
After looking at your second last post, you can see that your clutch plate/disc is not centred in the pressure plate. This means you would have struggled to get it all lined up during the fitting of the engine to the gearbox.
And that flywheel machining for the changed bolt pattern - looks awesome! I'm only ever seen hand filed ones. Not my fav thing to look at and was the reason why I swapped EJ cases with my L series box (but you guys don't get the dual range EJ boxes over there
 )
)So now that the engine is in, have you worked out where/how you'll lay the wiring out? I'm assuming you'll be running the EJ wiring into the cab and mounting the ECU under the dash somewhere rather than doing the ammo box mount in the spare tyre area...
Will your fuel pump/filter stuff currently in the spare tyre area be moved/mounted in a different or better location?
Cheers
Bennie
- Joined
- Nov 21, 2016
- Messages
- 53
- Location
- portland OR
- Car Year
- 81
- Car Model
- DL
- Transmission
- Manual 4spd
I didn't have an alignment tool, just eyeballed it, wasn't actually that bad if the car wasn't parked off to the side of my driveway close to my house maneuvering the hoist and things would've been easier.
Ya man, that dude did his own for his swap, fancy HUGE machine. Gotta have a forklift to move it lol.
I haven't even begun to start wiring yet, the dash is out, so ya I'm planning on running all of the legacy wiring and just adapting things to it that are different.
As for the fuel pump I'm hoping I can find a spot near the gas tank to mount it, all that stuff that's still in there is for the old Weber that was in there. So yes all that is coming out.
- Joined
- Nov 21, 2016
- Messages
- 53
- Location
- portland OR
- Car Year
- 81
- Car Model
- DL
- Transmission
- Manual 4spd
Got the legacy throttle cable in today, need to make a spacer between the manifold and the cable bracket and it should be good, removed some material from the plastic mounting point so it would fit in the firewall. After I fab a a spacer it should work great.
Started removing the rest of the wiring, the taillight harness is hacked up with alot of wire nuts and other bs that needs repaired. Gunna pull the taillight harness farther out and repair it without pulling it all the way through the rear panel so I don't have to remove the panel, somehow push the legacy harness through the same route and splice those together.
Started removing the rest of the wiring, the taillight harness is hacked up with alot of wire nuts and other bs that needs repaired. Gunna pull the taillight harness farther out and repair it without pulling it all the way through the rear panel so I don't have to remove the panel, somehow push the legacy harness through the same route and splice those together.
El_Freddo
Forum Member
- Joined
- Aug 11, 2008
- Messages
- 2,399
- Location
- Bridgewater, Vic
- Car Year
- 1988, 1990
- Car Model
- EJ22'd L series; Targa Brumby
- Transmission
- Locking FT4wd 5spd Manual, 4.111:1 diff w 1.59:1 low range & front OBX LSD ;)
Ah yeah, a full legacy harness swap.
Interesting. That should keep you entertained for a while. I've heard of this being done on an L series some time back and I think it worked well.
Keep up the good work
Cheers
Bennie
Interesting. That should keep you entertained for a while. I've heard of this being done on an L series some time back and I think it worked well.
Keep up the good work
Cheers
Bennie
- Joined
- Nov 21, 2016
- Messages
- 53
- Location
- portland OR
- Car Year
- 81
- Car Model
- DL
- Transmission
- Manual 4spd
Thanks! I think it will for a little bit lol.
Last edited by a moderator:
- Joined
- Nov 21, 2016
- Messages
- 53
- Location
- portland OR
- Car Year
- 81
- Car Model
- DL
- Transmission
- Manual 4spd
I've been wondering about the fuel lines on this thing before I even pulled the EA out and I found a post last night about how the older EA81 cars varied in the fuel supply and return lines. Some only had 2 some had 3 lines. But the return is tiny, almost like the vacuum and return are the same size, I gotta follow lines and double check to make sure I even have 3.
- Joined
- Nov 21, 2016
- Messages
- 53
- Location
- portland OR
- Car Year
- 81
- Car Model
- DL
- Transmission
- Manual 4spd
Got my drive belt from rockauto today, a whole 7 bucks including shipping.


El_Freddo
Forum Member
- Joined
- Aug 11, 2008
- Messages
- 2,399
- Location
- Bridgewater, Vic
- Car Year
- 1988, 1990
- Car Model
- EJ22'd L series; Targa Brumby
- Transmission
- Locking FT4wd 5spd Manual, 4.111:1 diff w 1.59:1 low range & front OBX LSD ;)
Maaate! You really need to start resizing your images - either through your image host program or by editing the size prior to uploading to the hosting site (this is how I do it).
I'd recommend that you use a second fuel in line - as your return. This way the fuel pressure regulator will not be restricted at idle and low load, low rev situations where the return flow will be at it's peak. I've done this on my L series and it works very well.
Here's the difference between the L series "fuel IN" line and the "fuel RETURN" line. The fuel IN line in this pic is now my RETURN line in the vehicle
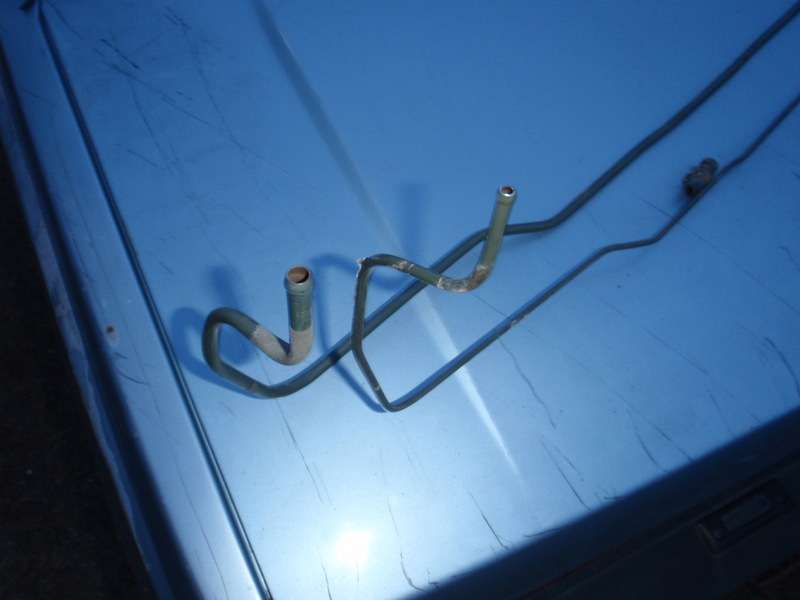
I'll also be going this on my brumby when the time comes (already pulled the line from another brumby).
And a bit of trivia for you: 8 years on my EJ conversion, one set of HGs (two years ago) and over 100,000km with a portion of that with some pretty tough offroading
Great engine! But I reckon you'll be looking for an AWD box before long. Keep an eye out for an RXII coupe gearbox - they're the first ever subaru AWD box and have a locking centre diff (great for offroad). I think you can work out how I know that
Cheers
Bennie
I'd recommend that you use a second fuel in line - as your return. This way the fuel pressure regulator will not be restricted at idle and low load, low rev situations where the return flow will be at it's peak. I've done this on my L series and it works very well.
Here's the difference between the L series "fuel IN" line and the "fuel RETURN" line. The fuel IN line in this pic is now my RETURN line in the vehicle
I'll also be going this on my brumby when the time comes (already pulled the line from another brumby).
And a bit of trivia for you: 8 years on my EJ conversion, one set of HGs (two years ago) and over 100,000km with a portion of that with some pretty tough offroading
Great engine! But I reckon you'll be looking for an AWD box before long. Keep an eye out for an RXII coupe gearbox - they're the first ever subaru AWD box and have a locking centre diff (great for offroad). I think you can work out how I know that
Cheers
Bennie
- Joined
- Nov 21, 2016
- Messages
- 53
- Location
- portland OR
- Car Year
- 81
- Car Model
- DL
- Transmission
- Manual 4spd
What did you pull that out of? Newer hatch with FI? The fuel lines have got me searching the Web to find a solution, was just gunna buy adapters and smaller fuel line for now, but that may be a better solution if I can find a car to pull them from.
Kevin
Administrator
- Joined
- Jul 28, 2008
- Messages
- 7,057
- Location
- Sydney, Oz
- Car Year
- MY'03
- Car Model
- Forester
- Transmission
- A/T
I've edited all the posts and resized pics to 40%. I used Paint Resize function to do this and reloaded the pics into a user album on here. I'd prefer to not have to do this as it takes a long time so it would be much better to have the pics resized in the first place. The thread is much more readable and will attract more attention with correctly sized pics.
El_Freddo
Forum Member
- Joined
- Aug 11, 2008
- Messages
- 2,399
- Location
- Bridgewater, Vic
- Car Year
- 1988, 1990
- Car Model
- EJ22'd L series; Targa Brumby
- Transmission
- Locking FT4wd 5spd Manual, 4.111:1 diff w 1.59:1 low range & front OBX LSD ;)
Andy, I pulled this out of an L series for use in my L series
You might find that a brumby (BRAT) or MY wagon fuel lines may be very similar.
I reshaped mine at the firewall to follow the old return fuel line route as I didn't want to pull my dashboard to run it with the inlet line's route (L series again).
Cheers
Bennie
PS - Thanks Kevin! But I'm not seeing any of the resized images now
Kevin
Administrator
- Joined
- Jul 28, 2008
- Messages
- 7,057
- Location
- Sydney, Oz
- Car Year
- MY'03
- Car Model
- Forester
- Transmission
- A/T
PS - Thanks Kevin! But I'm not seeing any of the resized images now
How about now?
El_Freddo
Forum Member
- Joined
- Aug 11, 2008
- Messages
- 2,399
- Location
- Bridgewater, Vic
- Car Year
- 1988, 1990
- Car Model
- EJ22'd L series; Targa Brumby
- Transmission
- Locking FT4wd 5spd Manual, 4.111:1 diff w 1.59:1 low range & front OBX LSD ;)
How about now?
Working awesome once logged in!
Thanks for that!
Andy, I was going to say that the square engine mounts are better than the round ones - I think they sit better and I've heard that they last longer. But as I continued with the pics I saw/remembered that you've already got it installed.
Did you use any wedges on the the engine mounts to help settle the bent angle of the rubber mounts?
Cheers
Bennie
- Joined
- Nov 21, 2016
- Messages
- 53
- Location
- portland OR
- Car Year
- 81
- Car Model
- DL
- Transmission
- Manual 4spd
The EJ already had the round ones on it, after 260k miles they seem to still be good so I left them on.
I have alot to post, with a bunch of pics but I don't wanna cuz they'll show up huge. Not sure why, any other site they are normal size. I started a Flickr but there's no links to post images codes at least on the mobile app.
By the way thanks Kevin for resizing everything.
So until I figure out a app to resize and post a image link this thread will be dead
NachaLuva
Product Developer
The old photos aren't showing up now??
- Joined
- Nov 21, 2016
- Messages
- 53
- Location
- portland OR
- Car Year
- 81
- Car Model
- DL
- Transmission
- Manual 4spd
The old photos aren't showing up now??
I'm not seeing anything either actually
- Joined
- Nov 21, 2016
- Messages
- 53
- Location
- portland OR
- Car Year
- 81
- Car Model
- DL
- Transmission
- Manual 4spd
Alright I resized things and used the sites uploader, takes forever...
First pic is what was all wired into rear taillight harness with some on/off switch as well
Got alot done the last few days, modded the torque strut to bolt to the adapter plate. Cut it and threaded the rod to m10x1.25
Started routing all the wiring, gunna have to extend some things but not much. After wrestling things in and out out the raintray holes a couple times, kinda got things to fit, the fuse box and ECU are going on the passenger side.
Bolted the header on, I'm missing a stud for some reason though. Got lost in the legacy disassembly.
Opened up the passenger side hole to fit the grommet in.


